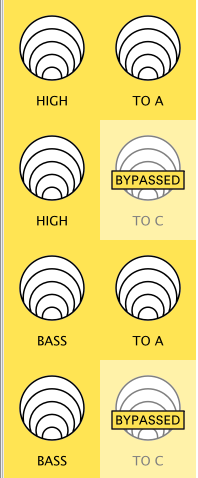
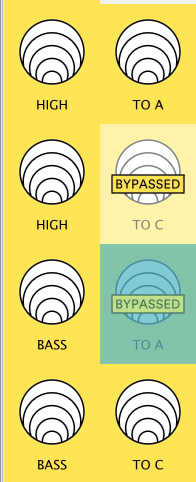
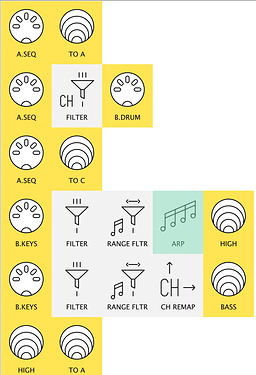
New to Midihub: Step-by-Step.05: Bringing it all together & branching out

In Step-by-Step.04, we used filters in MIDI Monitor to better understand the data coming in from two devices.

In this activity, we will use Midihub to control the data going out to a multiple outputs


We’ve learned some basics from the earlier activities, Now it’s time to build a major patch!


Timing
there are a number of stages in this activity
some are longer than others

to give an idea before you start we’ll give a comparative (and very rough!) estimate of each stage’s duration using the :clock1: symbol

'very rough' because:
  • we understand different aspects at different rates, and
  • some parts, like playing & experimenting might lead to…
    more playing and experimenting!

the more you get immersed, the more the possibilities of Midihub will open up to you!


2-in 3-out

:clock1: development: 1


In Step-by-Step.03 and Step-by-Step.04, We used one of these on early-type MIDI boxes…

Mergers,Splitters

… as the starting point to build patches

In this activity, we’re going to combine merging and splitting signals and have:

  • Two MIDI inputs
  • sending some combination of their messages to Three MIDI outputs


In the past, we’d have little choice or control…

…we would join the two units with a MIDI cable…

00_MergerSplitBoxes

…and send everything from the two inputs to all three MIDI outputs…

00_MrgSpl_connxDark

…with no control apart from how we configured our devices.


With Midihub, you get control over

  • which of our Two MIDI inputs…
  • …send messages out to which of the Three MIDI outputs…

…and as we will see later, that’s just the start!

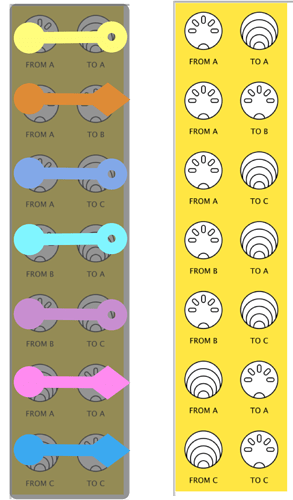
:thought_balloon: imagine, for a moment, what a flexible multi-purpose 2-in 3-out box might look like…

...now take a look:

01_MergerSplitBox

(did you remember the on/off switches?)!

There are a number of different ways we could configure connections like these.
In the next section, we will start designing a 2-in 3-out patch to suit a particular project.

1 Like

Now we’re ready to start…
…we’ll be evolving a patch together in several stages…

…taking decisions

…and making it more complex as we develop

So be ready to…
…get your gear together…
…pour yourself a cup/mug/glass

…and let’s get going!


Planning the Patch

:clock1: development: 6

To start building a working patch using a 2-in-3-out setup we need to plan what messages we want to send where

…and that depends on what we want to do!

Now… to decide what routing you want…

  • …decide what device is going to…
  • …link with what device
  • …on what channel


Here’s our gear:

INPUTS

Devices connecting to Midihub Inputs

We’re going to use the sequencer and KeyStep37 MIDI controller like before.

Follow along in your own way with your gear:

  • If you have at least one device that can send events on 3+ channels at the same time, that will be great.
  • If that device can send Clock too, even better!

OUTPUTS

Devices connecting to Midihub Outputs

It will be more rewarding if you have three devices…
…that can respond to MIDI input and make sound too!

But if you’ve just got one device with two ‘voices’ that will be good…
… and if not, use MIDI Monitor and your imagination!

We’re going use the a synth on 2 channels, a drum-machine and a multi-channel sound-module


So our setup is like this:
02Ins&OutsFullxClock


See: the Sequencer will send messages to all 3 audio devices…

but the MIDI controller doesn’t need to connect to the Drum Machine.

(Also: notice two of the audio devices have channels we don’t want to use)


:high_brightness: Take a few minutes to sketch out your devices…
(including imaginary audio outputs?!)
…with their channels, event types, etc


Our ‘Set up’ has the same connections…

…as the “MIDI Merger Splitter” we saw above…

01_MergerSplitBox

… just one of the connections is switched off


:high_brightness: Now picture the Midihub connections…

...there's more than one way of doing it...


one way would be to join directly to the outputs…

...like this:

01_MergerSplitBoxOverlay2

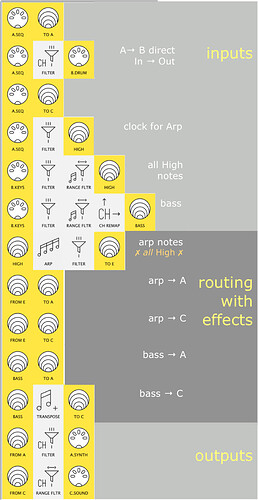
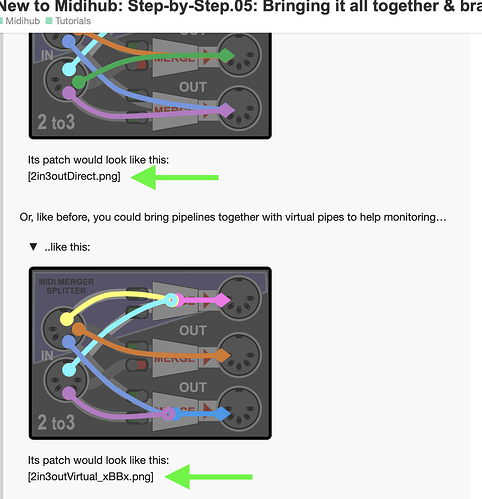
Its patch would look like this:
[2in3outDirect.png]

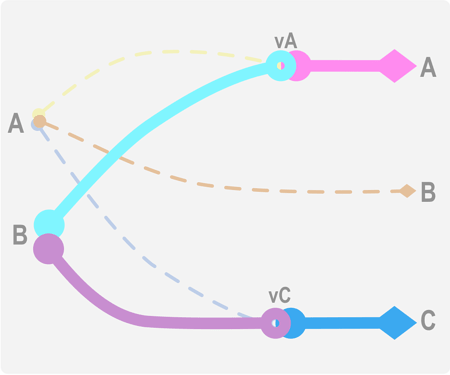
Or, like before, you could bring pipelines together with virtual pipes to help monitoring…

..like this:

01_MergerSplitBoxOverlay

Its patch would look like this:
[2in3outVirtual_xBBx.png]

Or you might design a completely general and re-usable 2-in-3-out patch…
…and just disable/delete the inputs you don’t want…

...like this:

01_MergerSplitBoxOverlay3

Its patch would look like this:
[2in3outGeneral.png]

Each “wiring” has it’s pluses and minuses


With Midihub, you’ll often find you have a choice about how to get what you want.
:arrow_lower_right: more on Midihub choices

We’re going to use the second option as a middle way:

:high_brightness: Now: build the patch…

...it should look like this:

Now Save your patch with a name like 2In3Out_0.mhp
(we’ll be making several versions as we go on)

In upcoming sections , we’ll start making decisions about how to make sure the right messages go to the right place


:arrow_upper_left: : more on…

Midihub choices:

As you saw above, there are a number of ways of even routing a patch:

  • the first is very simple and saves virtual pipes but isn’t very flexible
  • the second is more flexible. It could be ‘reduced’ to the simpler version when everything is completed
  • the last is super-flexible. Some users like to build ‘template’ patches –especially if they’re using the same kit for several patches

As you learn more about Midihub, you’ll also find that you can do the same job with a choice of different pipes.

The Midihub Editor makes it easy to change your mind –and your patch– as it evolves.

1 Like

Making things clear

:clock1: development: 3

You might want to start patching right away…
…or you might want to take a pause to learn about

  • naming ports with custom names

  • adding patch notes in the Description Panel


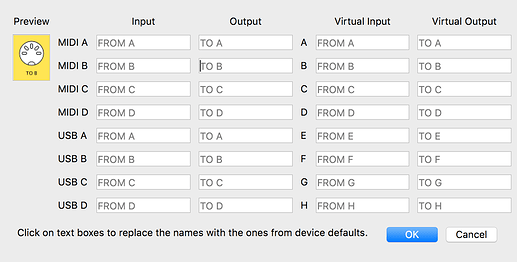
Naming Ports

Clicking the Edit button in any port’s Properties panel…

…opens the Edit Preset Port Names... window for all ports:


You can rename any port, including Virtual ports

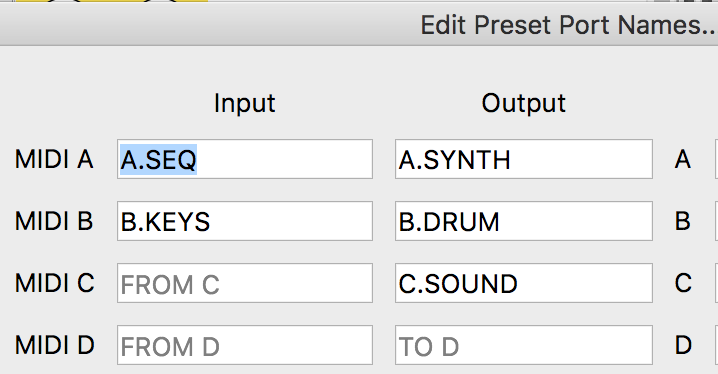
For now we’re going to name the MIDI-DIN ports that we’re using.

:high_brightness: type in these port names…

01_2to3_Names

…we’ll be using them from now on


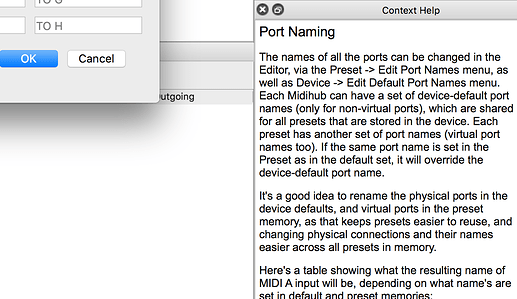
Also Note: the Context Help for Port Naming gives extra advice about naming ports:


Adding Notes

Typing notes into the the Description Panel…

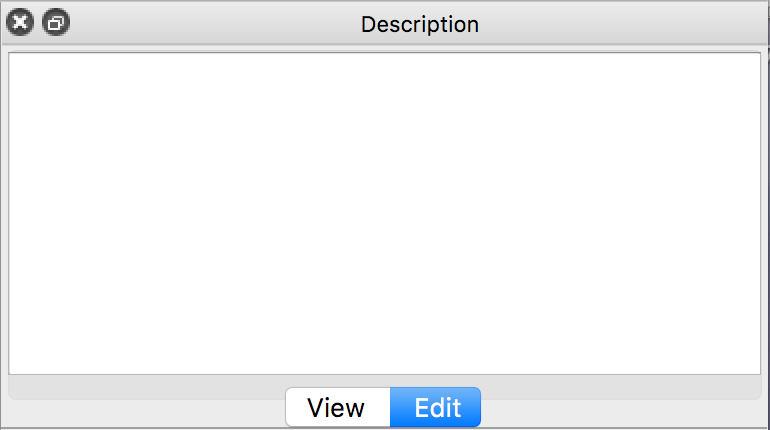
00d_2to3_Description

…can help remind you later about key aspects of your patch.

A Description can be up to 1024 characters long…
…after this, your typing will be ignored!

You can keep the Description Panel in Edit mode.

In View mode…

...it might look different...

…because some characters affect the layout.


To find out more:

  • download & open this file:
    DescriptionPanel.txt (211 Bytes)
  • paste the text into the panel in Edit mode
  • click View mode to see the difference

If you have enough characters, formatting can make your Description clearer!

1 Like

Making the Right Connections

:clock1: development: 8 testing: 3 play: 6+

Whether you’re building a patch to get the most from your gear in your “studio” or trying to get the smoothest “performance” possible, building a patch is often about evolving ideas and changing direction as you try things out.

We will “signpost” these ‘junctions’ with :left_speech_bubble:thinking aloud :speech_balloon: captions


This is our starting point:


:left_speech_bubble: I’m going to mostly leave the sequencer to do it’s stuff…
…the most I might do is mute a part/ clip every now and then.

I mainly want to add synth Lead notes with controller keyboard…
…maybe holding notes with the controller’s Arp on

I’ll change keyboard channel to switch to Bass when it feels right :speech_balloon:

Remember our set-up:

02Ins&OutsFullxClock
of course you’re writing for your set-up


To start:

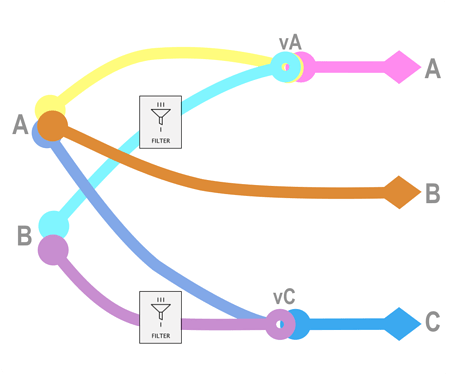
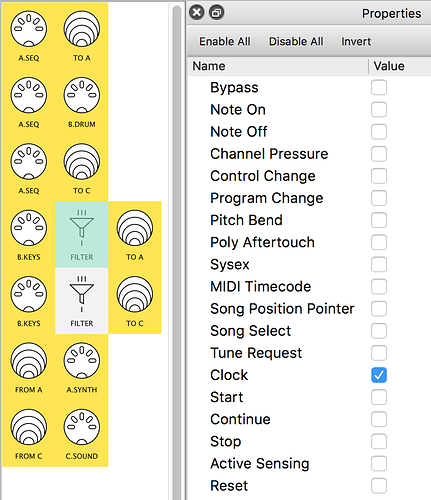
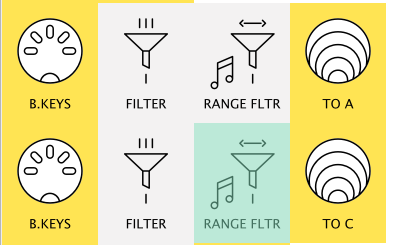
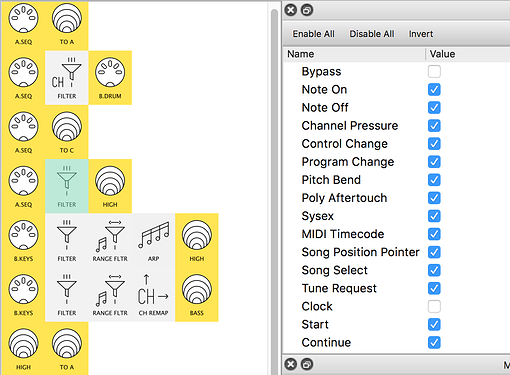
In Step by Step 04, we used a Filter to stop any Clock messages getting through from MIDI-B.

:high_brightness: Now: we want to do the same thing in two pipelines:

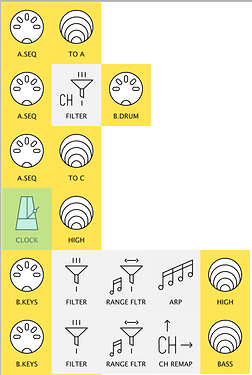
Add: Filter pipes to stop Clock messages where they’re not needed.

Try it yourself then check:

(see also: we’ve changed the MIDI port names to make things a little clearer)


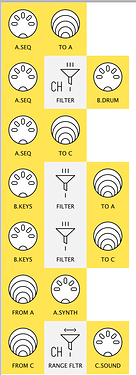
Now: we need to make sure we get the channels right for each device

SO we want to filter channels instead of events
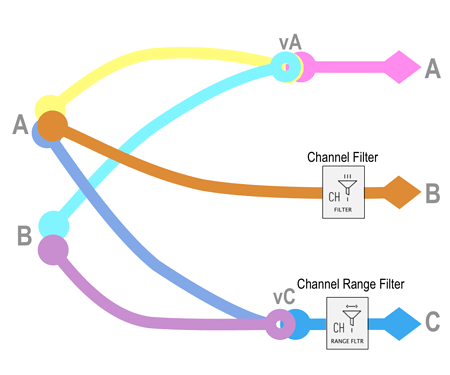
There are two types of pipe for Filtering channels.

:arrow_lower_right: more on the need to filter channels

:high_brightness: drag these pipes into the correct pipelines:

your patch should look like this:


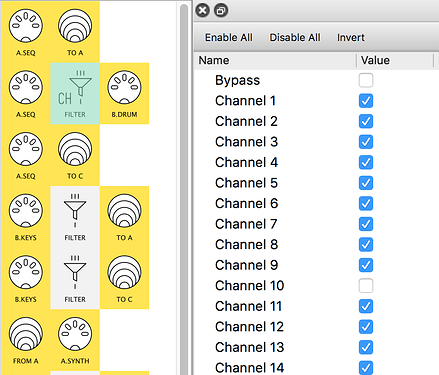
Let’s’ look at Channel Filter first…

…see how it works like Filter – we click the boxes we want filtered

:high_brightness: Now set the Channel Filter for the AB pipeline channels…
(…allowing only the channels we want to goto B …)

..then check:


Tip: to save lots of clicking you can just:

  • check Channel 10 then click Invert
  • click Enable All then uncheck Channel 10


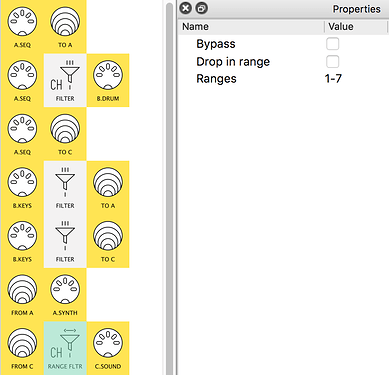
Channel Range Filter does the same job in a different way

:high_brightness: Now set the Channels for the Avirtual C pipeline.
(…the sound module only wants channels 1-7)

...it should look like this

“only allow 1-7 through”


or
03c_2to3_CHRF_drop

“block 8-16”

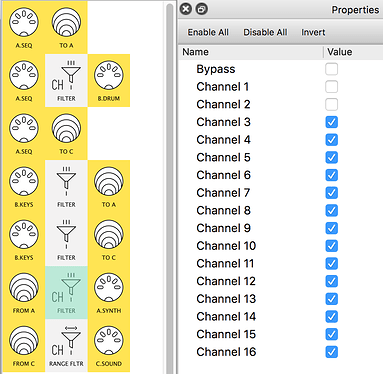
:high_brightness: Now let’s set a Channel Filter for the virtual AA pipeline.

...it should look like this

“don’t filter out 1 & 2”

:thought_balloon: you might be thinking…
:arrow_lower_right: why two pipes that both filter channels?


Now we’ve set our channel filters, we’ll do a quick check that they are working

:pushpin: as you go on, you’ll likely form testing routines:

  • keeping a sequence running as you move from pipe to pipe, looking at MIDI Monitor
  • performing the same series of key-presses, or control moves
  • listening to output for sounds that should (and shouldn’t!) be there

don’t forget MIDI Monitor filters !

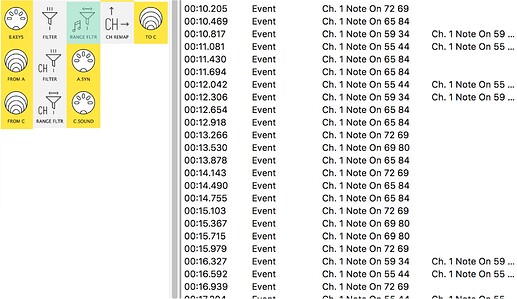
:high_brightness: check the input and output…

...of the three channel filters:

(we’ve set MIDI Monitor filters to show only Note on events so we can see more of them!)

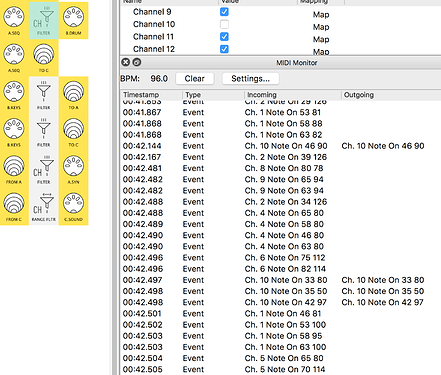
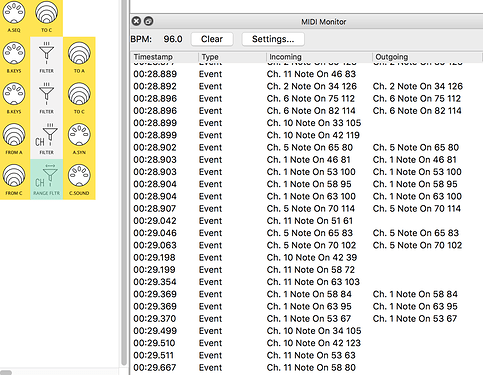
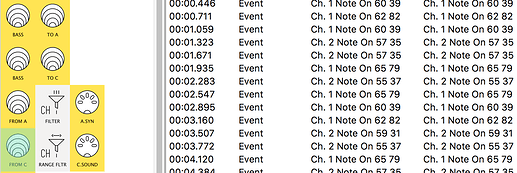
A.SEQB.DRUM

…only lets Channel 10 through


Virtual AA.SYN

…allows Channels 1 & 2


Virtual CC.SOUND

…No channel above Channel 7 is allowed through!


Now Save your patch with a name like 2In3Out_1.mhp

:game_die: if you have sound gear attached to your version…
…have a play to learn how your new connections work!
…try clicking Bypass on various pipes to hear the difference they make


After running the sequences with our set-up…
…and playing lead notes…
…and using the controller’s arp…
…and switching to channel 2 for the some extra bass lines
It feels like something could be improved…


:left_speech_bubble: …All my Bass playing is in a different octave to the Lead notes

Let’s try a split keyboard so I can play both at the same time :speech_balloon:


:arrow_upper_left: more on…

...the need to filter channels...

Remember with old-style mergers and splitters, there was no way to do this.
Fortunately MIDI devices ignore channels they’re not assigned to.

So it’s not always necessary to use channel filters…
…but it can be useful…
…even if, later, you decide to remove some!

:arrow_upper_left: why two types of pipe…

... that both filter channels?

In ‘everyday’ use they do the same thing, so it’s a matter of which you prefer.

The real difference comes when you want to change the pipe with external controls
This is called “mapping”.

:thought_balloon: Look at the properties for Channel Range Filter and Channel Filter:

Imagine what will happen if you have a button…
…that will turn each ‘mappable’ checkbox…

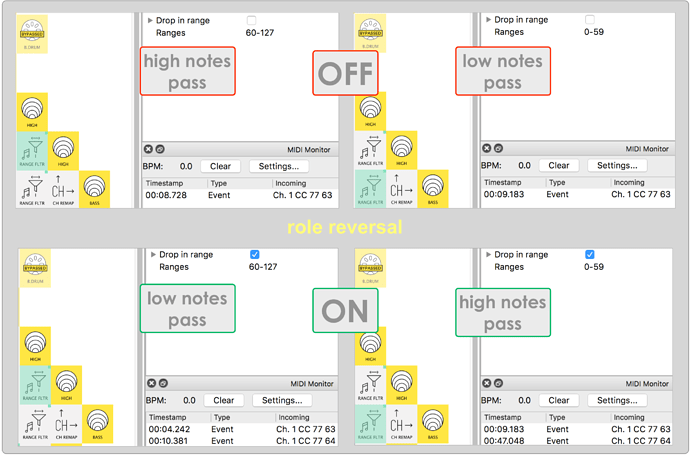
… the Drop in range for Channel Range Filter can be quite powerful and interesting:
flipping the role of the filter turning in on & off

we’ll come back to mappings quite soon…


Our patch so far:


Our initial “wiring” is ready for use with our Setup…

…with the channels we want directed properly.

Often a simple channel routing like this is all we want


Then there are those times when you want Midihub…
… to make more of our gear…
…and performance!

The rest of this activity is about this sort of Midihub customisation

1 Like

Splitting the keyboard

:clock1: development: 5 testing: 3 play: 1

Our basic patch with Channel Filters works OK…
…and playing it leads to a new idea:


:left_speech_bubble: All my Bass playing is in a different octave to the Lead notes

Let’s try a split keyboard so I can play both at the same time :speech_balloon:

So we want to send some notes one way…
…and the rest another way

:left_speech_bubble: Not sure what the routing should be, but I’ll try filtering some notes first and work it out as I go along… :speech_balloon:

We’ve tried filtering message types and channels
…now let’s filter a range of notes


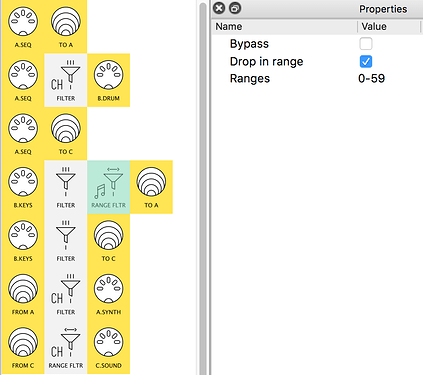
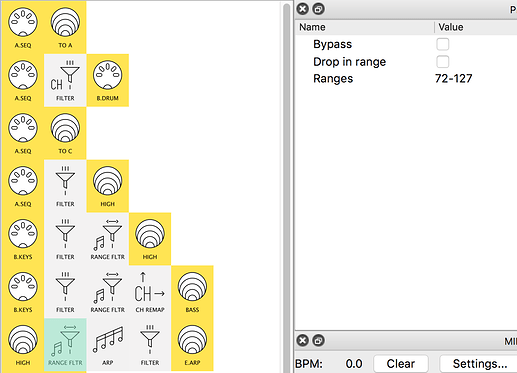
:high_brightness: First, let’s put a Note Range Filter in the A → virtual A pipeline.

Let’s stop any note lower than Middle C getting through.

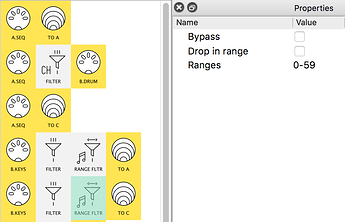
Now check: it should look

...something like this:

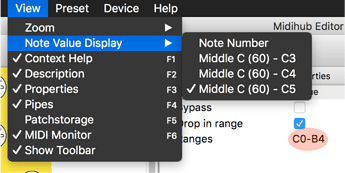
Your Ranges value…

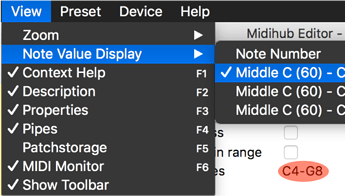
...might look different:

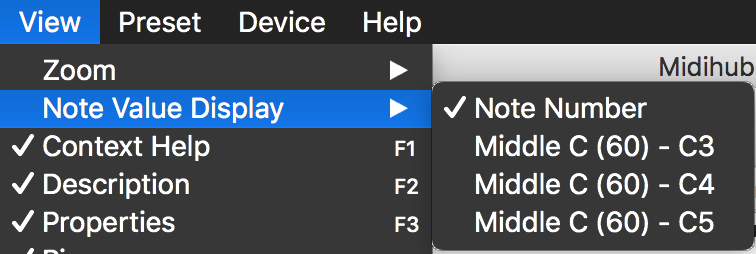
Check ViewNote Value Display:

04a_2to3_NTRF_disp1
If you change the setting, the values will appear as Note Names:

Note Names are ‘more musical’ but when devices use different standards, things can get mixed up.
Using Note Value DisplayNote Number helps avoid confusion.


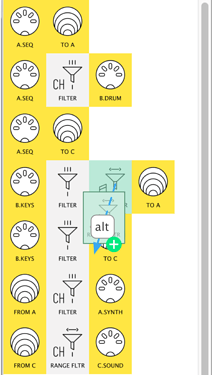
:high_brightness: Now, let’s drag a copy of the Note Range Filter we just set…
…into the next pipeline.

Hold the ‘alt’ key while you drag the pipe…

...like this:

NOW we can just click Drop in range to allow only the Bass notes through (instead of blocking them like above)

:pushpin: Sometimes a new pipe will be almost the same as an older one.

Then, it’s often quicker to use alt-drag…
…rather than making all the settings from scratch!


Now: look at the changed pipelines …

04b_2to3_NTRF2&1detail

and…

:thought_balloon: …imagine which notes will be played with which voice:

The controller is playing notes on Channel 1…
…but now only some notes are going out of Virtual A
…and the others through Virtual C

So what would you hear when you played notes…
…from the E above middle C …
…down to the G below middle C…?

Let's think it through:

When the keyboard is on channel 1…
…the routes the notes take are:

  • Channel 1 → Virtual AA.SYNTH → Synthesizer Lead Sound
  • Channel 1 → Virtual BC.SOUND → Sound Module Lead Sound

So the higher notes:
E, D#, D, C#, C…
…will play on Synthesizer Lead:

  • which is what we want…
  • but we also want to be able to have Sound Module Lead play them too!

And the bass Notes:
B, A#, A, G#, G…
won’t play on the Synth at all

  • and play on Sound Module Lead…
  • instead of Sound Module Bass!

Now, let’s get the Bass Notes playing through the Sound Module Bass

To do that, we need to…

…change the notes going to Virtual C
…from Channel 1 to Channel 2

Time to use our first Remap pipe!

Just as we can filter:

  • Channels,
  • Notes,
  • and CCs

We can also remap them too.

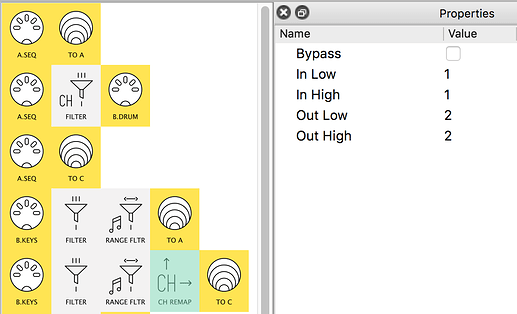
:high_brightness: Now try remapping Channel 1 to Channel 2…
…in the B.KEYSVirtual C pipeline…

...it should look like this:

This means:
"Let only Channel 1 through…
…and map it to Channel 2"

so if we did change our controller to Channel 6 or 16 or even 2
…no notes (or other channel events) would get through.


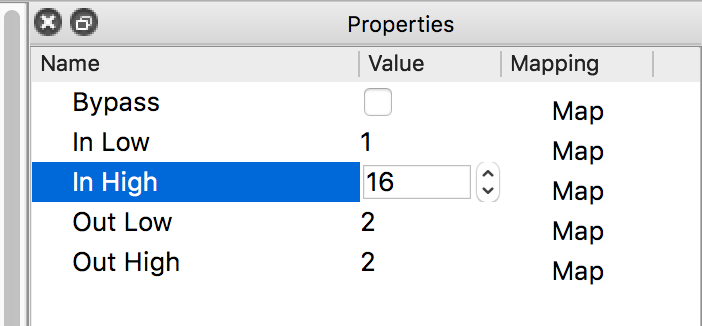
Another possibility here would be…

04c_2to3_NTRF2CHRM_panelalt

Now we have:
"let every Channel event through…
…and ‘squeeze’ them all into Channel 2!"

This could be useful here, too

:game_die: play with your keyboard and Channel Remap for a little…
…changing your keyboard channel if possible,
…while trying different In|Out Low|High combinations…
… for different remapping outcomes, like:

  • “shifting” eg: [1;3] → [9;11]
  • “squeezing” eg: [1;16] → [3;3] or [1;6] → [3;5]
  • “stretching” eg: [1;3] → [1;9]
  • “flipping” eg: [1;3] → [3;1]

\

:pushpin: Channel Remap, Note Remap and CC Remap all work in a similar way…
…so everything you learn about one is true for the others too!

:eye_in_speech_bubble: the other Remap pipe – Scale Remap – works in quite a different way.
More on that another time… :link: :wink:


:left_speech_bubble: Now we should have all the right notes…

…going to some of the right places! :speech_balloon:

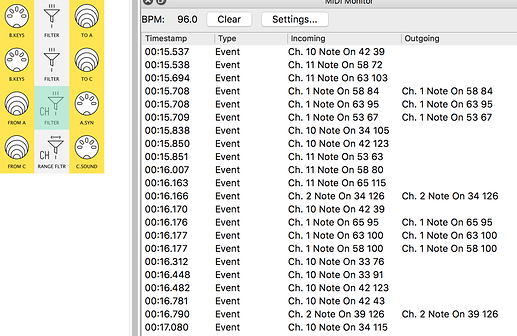
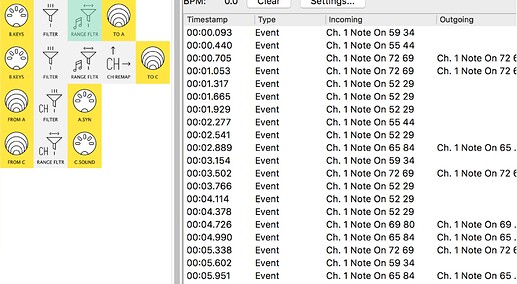
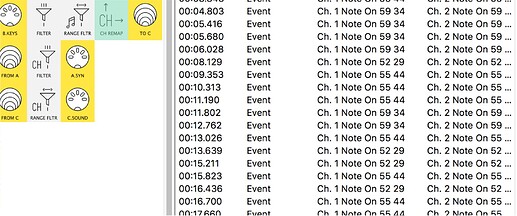
:high_brightness: check the input and output…

...of the Note Range Filters and the Channel Remap:

(We’re just showing Note on events in MIDI Monitor )


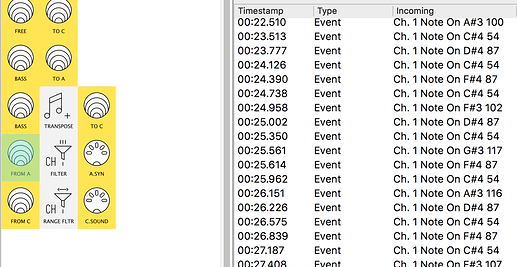
‘High’ notes → Virtual A

…and none of the Bass notes allowed through

‘Bass’ notes → Virtual C

…are in the correct range, but still on Channel 1…


…but after Channel Remap


…are now Channel 2…
…ready to play the Bass voice on the Sound Module!


Save your patch with a name like 2In3Out_2.mhp

1 Like

Reconnecting

:clock1: development: 6 testing: 2 play: 3+

:left_speech_bubble: Now I have all the right notes…
…going to some of the right places!

I need to make the other connections :speech_balloon:

With Note Range Filter, we can now send:

  • some notes down one line
  • and others down another

And with Channel Remap we can play ‘bass notes’ on Channel 1…
…but have them “sound” on Channel 2.

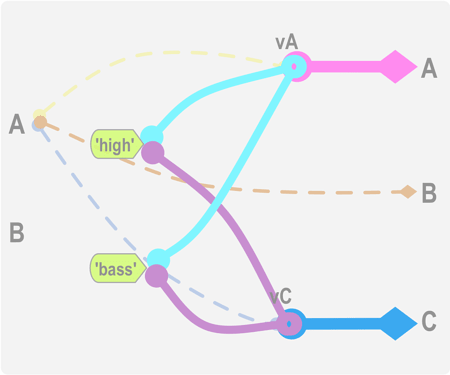
Now we want both lines to connect with Virtual A and Virtual C

This is like when we were planning the patch earlier…


…with MIDI-B → both Virtual A and Virtual C

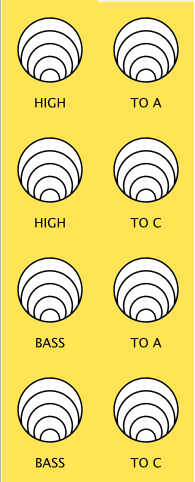
Now we want…

  • …“High”-> Virtual A and Virtual C, and…
  • …“Bass”-> Virtual A and Virtual C

…so like this:

So we need two more virtual pipes.

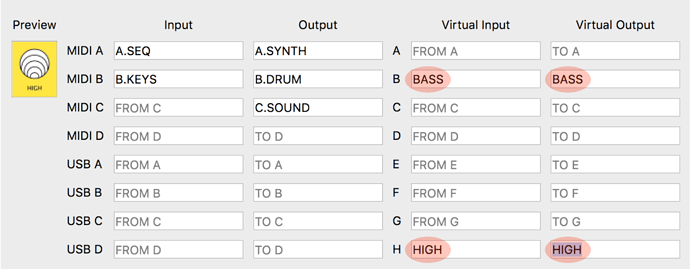
We’ll use Virtual B and Virtual H.

you can rename them if you want...


(we did a detour in section 3 on naming ports with custom names)

…or remember B = Bass and H = High!


Now let’s join everything up!

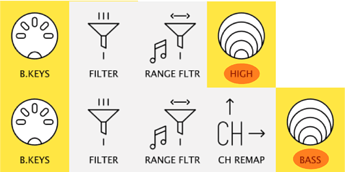
:high_brightness: First: let’s change the Virtuals at the end of our “High” and “Bass” pipelines…

...they should like this:

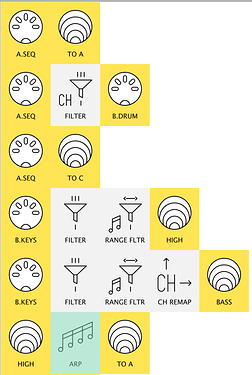
Then add the pipelines to connect the “High” and “Bass” pipelines to Virtual A and Virtual C

...like this:

04d_2to3_virt_BH__detail

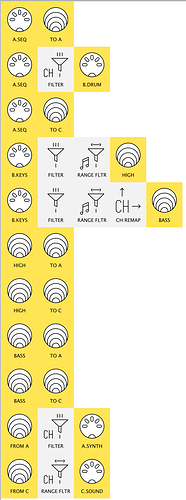
The patch now looks like this:


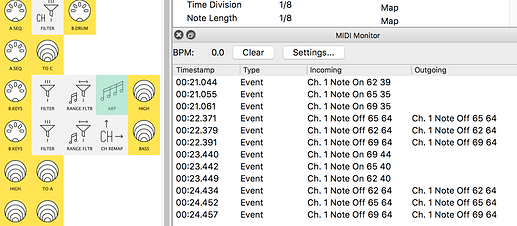
:high_brightness: check the input and output …
…of Virtual A-IN and Virtual C-IN

...playing a few notes above and below Middle 'C':

Now we’re monitoring the result of separating our notes by range…
…changing the channel of the lower ones…

…and recombining them for two different outputs:

now all the notes below Middle C (60) are changed to channel 2…
…and the higher notes on channel 1…


…and leave both outputs…

…just what we want!


Now Save your patch with a name like 2In3Out_3.mhp

:game_die: if you have sound gear attached to your version, have a play to learn how your changed split-keyboard connections work!

Try enabling and disabling different combinations of…

...in-pipes or out-pipes:

For example…

…listening to only the synth…
04e_2to3_virt_BH__disab2

…or the synth on one part and the sound module on the other:
04e_2to3_virt_BH__disab3

This might give you new ideas.


We’ve now gone further than our original aims

Having a split keyboard brings new possibilities…
… and issues we didn’t anticipate…

1 Like

Different Directions

:clock1: development: 1-

Trying out new patch changes can lead to new ideas…


:left_speech_bubble: Quite like that!

Bet the sound module’s bass would be better as a sub-bass, though! :speech_balloon:

and sometimes things that don’t work


:left_speech_bubble: Oh, of course!

the controller doesn’t know about the keyboard split …

…so when I turn the Arp ON…
… the bass notes become part of the Arp pattern too!:person_facepalming:
…Need to figure that one out :speech_balloon:


We’re going to try the Bass pitch-change first…

…then see what to do about the Arpeggiator

Changing Pitch

:clock1: development: 1 play: 3+

:left_speech_bubble: … the sound module’s bass would be better as a sub-bass… :speech_balloon:

We can take advantage of out separate lines for our parts…
…to modify one or more of them

Let’s change one of the parts by an octave

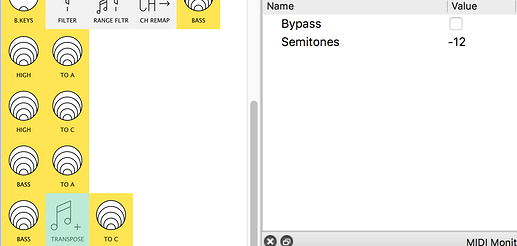
:high_brightness: put a Transpose pipe in the ‘Bass’ → ‘Virtual C’ line…

...and set it to -12 semitones:

:game_die: play with Transpose in different ways

...such as:
  • using -24 semitones
  • inserting another -12 Transpose in ‘Bass’ → ‘Virtual C’ line…
    …so both bass voices are pitched down…
    …but one of them gets a “double-transpose”!
  • transposing one of the lead lines up an octave

Of course, it doesn’t have to be whole octaves…
…but then you might want to explore Scale Remap as well, to put everything back in key!


Now Save your patch with a name like 2In3Out_4.mhp


It’s time to solve that Arpeggiator issue…

1 Like

Adding an Arpeggiator

:clock1: development: 10 testing: 2 play: 6+

:left_speech_bubble: …when I turn the controller’s Arp is ON…
… the bass notes also become part of the Arp pattern :speech_balloon:

So we can’t use the Arp and play Bass at the same time.

How do we work around this?

We have several options:

:left_speech_bubble: I could…
… just NOT play bass when Arp is ON… :speech_balloon:

sometimes we decide to work within the limitations of our gear…


…but otherwise, we’re going to want to use…
… Midihub’s powerful Arpeggiator pipe.

That gives us at least two more options:

:left_speech_bubble: I could…
… make a SECOND keyboard split…
… and make a part of the keyboard “Arpeggiator only” :speech_balloon:

This would be possible – but limited – with 37 keys…
…OK with 49+ keys (depending on your style/project)…
…but probably not that viable with only 25 keys!

This option would also allow some lead notes and a separate arpeggio…


OR

:left_speech_bubble: I could…

… CONTROL the Midihub Arpeggiator
… using the MIDI controller to turn it on and off…
…and maybe more! :speech_balloon:

Depending on what kind of keyboard controller you have, (and how it fits with your playing style), this would give you…

  • …an arpeggiator over the “high” notes when you want it
  • …or just a plain split-keyboard when you don’t!
  • …but not both at the same time


Before we try either option:

Let’s try an Arp into the “high” line somewhere and see how it works!
(we can always move it later)

:high_brightness: First: drag an Arpeggiator pipe into the MIDI-BVirtual H / HIGH line…

..it should look like this:


or this:

(if you want to send a send an arpeggio to just one voice

…and a held chord to the other)

:high_brightness: Now watch the MIDI Monitor as you hold a chord and release it…

...you should find:

it doesn’t work!

Selecting the Arp pipe…


… the MIDI Monitor only shows Note_off events getting through…


… and selecting the OUT pipe after it…

…confirms this


Why?

the answer is in the Context Help panel for Arpeggiator:

“The notes produced are quantized to the tempo, so MIDI Clock messages must reach this pipe for it to be able to do its work.”


and at the moment we have no Clock going to that pipeline!


So we need to get clock messages through to the Arpeggiator…
…no matter how you decide to build your Arp!

We need to provide a clock like this:

:high_brightness: Add a MIDI-AVirtual H / HIGH pipeline…
…and add a filter to only let Clock messages through…

...like this:

Remember, even if your MIDI-A-IN device can’t send Clock messages…
…Midihub can…

...like this:


so you can still get Arpeggiator to work!


Now: let’s join things up!

we need add new pipeline to hold the ARP pipe…
…so it can receive Clock messages to work

Here’s the change we want in a simplified diagram:
SbS05.9_newARPline1
let’s go through the steps…

:high_brightness: create a new pipeline…
…so the Arpeggiator can receive the Clock…
…coming into HIGH

…we want to send the HIGHArpeggiator notes out to a new Virtual pipe…
(…we’ll use Virtual E
…so a new HIGHVirtual E pipeline)

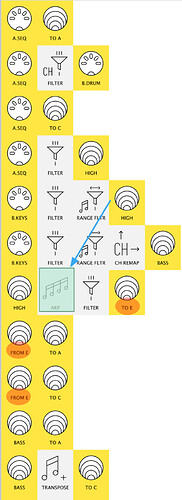
…then we’ll connect Virtual E to Virtual A and Virtual C !

Your changes should look like...

…this:

We’ve made a few changes here:

  • Arpeggiator is now in a new HIGHVirtual E pipeline
  • HIGHVirtual A and Virtual C is now…
    Virtual EVirtual A and Virtual C and …
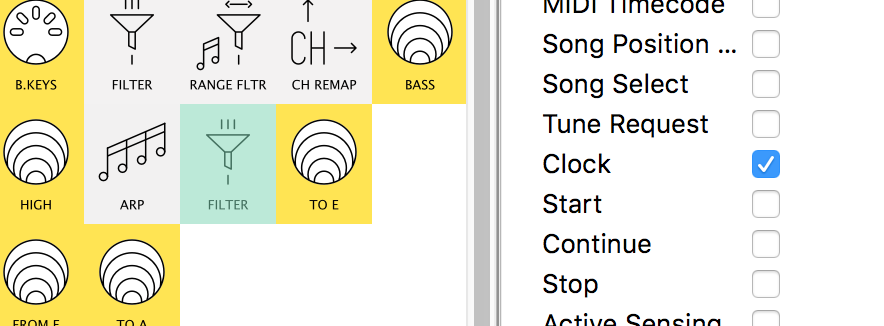
  • :eye_in_speech_bubble: …did you spot the new Filter pipe?
it is needed because:
  • we need clock messages to make Arpeggiator
  • but we don’t want them to conflict later

06d_2to3_E_temp_arpFiltDetail

See: it’s like our earlier Filter, but Inverted

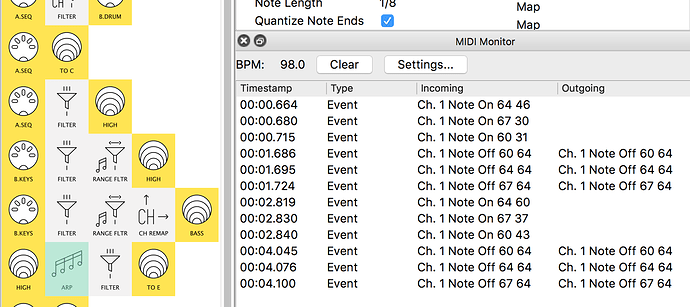
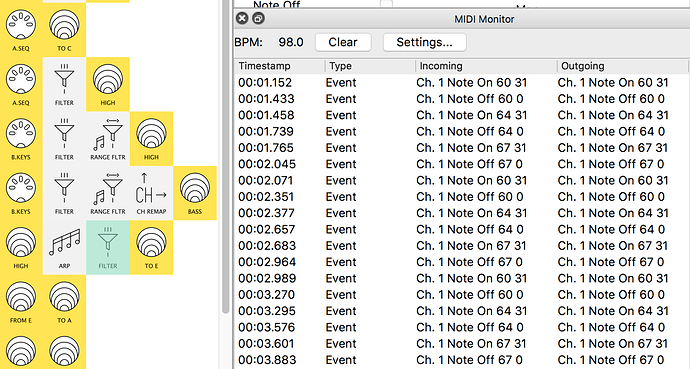
:high_brightness: Now check the MIDI Monitor again when you hold a chord…

...you might find:

That selecting the Arp pipe itself…

still shows only Note_off when the chord is released

Before you get concerned…

try selecting the Filter pipe after it…

…this shows the Arpeggiated notes just as expected!

:pushpin: some “Clock-reliant” pipes…
…like Arpeggiator, Note Repeater, and Delay
… give unexpected results in MIDI Monitor. It’s a confirmed bug that will get fixed.

When this happens
Monitor the Incoming events at the next pipe…
…to see the real Outgoing events from Arpeggiator or Note Repeater/ Delay


:pushpin: Testing by ear!
It’s very useful to be able to Monitor what events are going through a particular pipe…
…but it’s also important to hear what coming from several outputs.

Sometimes it’s also useful to cut off certain inputs too…
to allow us to concentrate on the input that we’re really focussed on.

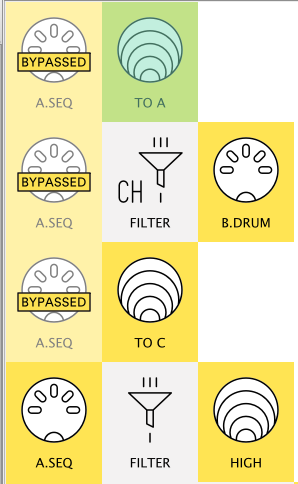
Here we’ve stopped everything from A.SEQ

A.SEQ_Bypass_for_Sound

…apart from the Clock for the HIGH pipelines.


We know we’ve still got…
…decisions to make and…
…more to build

But take some time to…

:game_die: play with the patch so far:

  • play some left hand bass while holding right-hand Arp chords
  • use Bypass to listen to combinations of the ‘voices’ on MIDI-A and MIDI-C
  • and explore the Arpeggiator pipe…
    (…if possible with a ‘Mouse Hand’ and a ‘Chord Hand’…)
The ARP pipe has quite a few features:

some are found in many arps:

  • like Time Division and maybe…
  • Note Length and Swing
    …but others are more unusual:
    like maybe Accent and the Chord Type

…and not many arps have:

  • Repetitions and
  • an Octave Range of -7!
    (maybe the arp should be on the bass notes!)

Now Save your patch with a name like 2In3Out_5.mhp

…it will be the starting point for both of the next developments!

1 Like

An Arpeggiator with a Keyboard split

:clock1: development: 8 testing: 4 play: 4++

Picking up where we left off, we want to…

:left_speech_bubble:… make a SECOND keyboard split…
… and make a part of the keyboard “Arpeggiator only” :speech_balloon:

If you took a break…

...this was how we left our patch


To make another keyboard split…

We’ll use the same idea we did when…
… we split the MIDI-B out to HIGH and BASS:

04c0_2to3_Tree_BassH

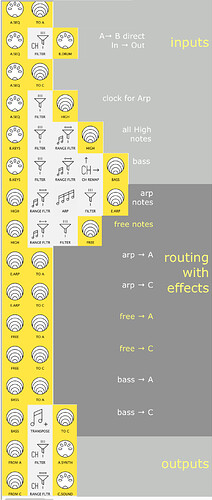
Now we’re going to split the HIGH into “ARP” and “FREE”

:thought_balloon: Picture this for a moment…

...then check:

04c3_2to3_Tree_BassH>FreeArp


:eye_in_speech_bubble: Yes, ARP & other pipes only left out of the diagram!


Now: let’s add in the extra pipelines:

As well as Virtual E
…we’ll need another virtual pipe…

…we’ll use Virtual F .

(we’re also going to rename Virtual E and Virtual F
to E.ARP and FREE
…just to make their purpose clearer)

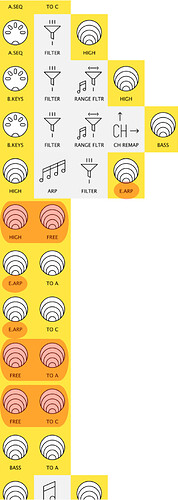
:high_brightness: Change the Virtual-in pipes and add the new pipelines…

...they should look like this:


See:

  • we’ve assigned a Virtual F pipe for the “free-play” notes
  • changed the Port Names for Virtual E & Virtual F
    …to E.ARP & FREE
  • and added new pipelines:
    HIGHFREE
    FREEVirtual A
    FREEVirtual C
    to route the “free-play” notes

We now have:

  • a working Arp in a ‘HIGH’ → Virtual E pipeline…
  • …splitting off to play on Channel 1 to Virtual A and Virtual C

Two tasks remain…
…to make sure:

  • only some of the “High” notes play in the Arp,
  • leaving the others to play on the “FREE” pipeline

So… we need to add two more Note Range Filters

:high_brightness: First: put a Note Range Filter in the Arp pipeline…

…have its range start an octave higher than the “High” range.
(Make sure the notes are filtered before they can be used by the Arp!)

It should look like this:

your display may show Note names...

…depending on your Note Value Display setting:

Change to Note Value DisplayNote Number to check your values


So now we have a Note Range Filter for “Arp” notes, …

we also want a Note Range Filter for “Free” notes.

We can give it a new Range
…or just set it to do the opposite of the “Arp” Note Range Filter

:high_brightness: Now: add the Note Range Filter in the HIGHFREE pipeline…

and give the pipeline its own Clock Filter

...like this:

The completed patch…

...should look like this:


Now we have:

  • Bass on channel 2 at the bottom end of the keyboard;
  • “Free -play” on channel 1 in the middle octave; and
  • Arpeggio play on channel 1 at the top end of the keyboard!

As well bearing able to hear our 3-part keyboard in action…
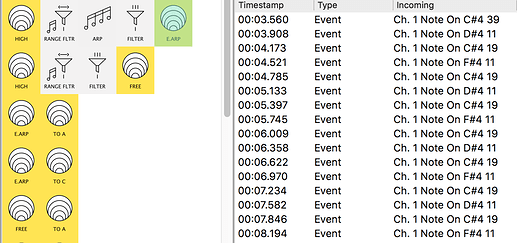
…we can use MIDI Monitor too…

...to check the output:

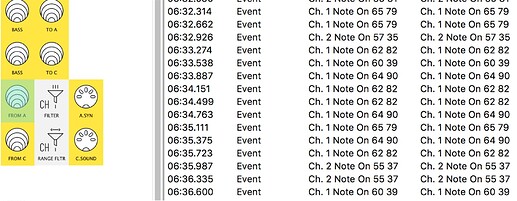
Here’s some “free play” notes from the middle of the keyboard…

…but exactly the same output set to Middle C (60) - C3

…makes it much more obvious these are the ‘black keys’ in the middle octave!


This display shows the arpeggio playing in the octave above…

(you can tell we set the Octave Range to +0 to keep things simple!)


and here’s the combined output:


Now Save your patch with a name like 2In3Out_6split.mhp

:game_die: play with your 3-zone keyboard:

  • like before, experiment with turning pipes on & off
  • does “bass-free-arp” work for you…
    …or is “bass-arp-free” better?
    (it’s just a quick change to two Note Range Filter pipes!)
  • put a Transpose in the ARP pipeline to drop an octave?
    (…does it make a difference whether it’s before or after the ARP pipe?)

Now we’ve seen one way of having both Arpeggiator and “free” play on the higher notes…

Let’s see how to switch easily to have one or the other.

1 Like

A ‘Switchable’ Arpeggiator

:clock1: development: 6 testing: 1++ play: 5++

(testing time will depend on your familiarity with your MIDI gear…)

:left_speech_bubble: I want to turn the Midihub Arpeggiator ON & OFF…

… using the MIDI controller :speech_balloon:

To create an Arpeggiator that isn’t always on…

…we can go back to the patch where all the “High” notes go to the ARP pipe

…and add the ability to bypass the ARP


Reload the patch you saved at the end of the Adding an Arpeggiator section…
(we called the patch 2In3Out_5.mhp )


if you need a reminder…

...this is how that patch looks:

…Let’s start from there.


First…

:high_brightness: …choose a control on one of your devices…

...what counts as a "control"?

Basically anything that sends out a note velocity or a CC value…
and is connected to your Midihub!

But…

…Some controls are more useful here than others:

  • a keyboard key
  • or a “momentary” button
    …would need to be held down to see the mapping effect
    (this is OK for this ‘test’ but not really in practice!)

Not sure if your gear has got a control for mapping?**

:high_brightness: Then it’s time to explore…

...your possibilities!

First, if you’re really stuck…
you can just use a key (on the keyboard on MIDI-B)…

...like this:
  1. Go to the Note Range Filter in the B.KEYSBASS pipeline
  2. Change the Ranges so that it ends at the A# below Middle C (note Number 58)
  3. Now the B below Middle C won’t “play”…
    …and can be used for Bypass mapping instead!
    This B key will now be your control; when you hold it down quickly the control wlll be ON – and OFF when you release
    (maybe not ideal, but this is just to watch a mapping at work so you can begin to see how great they are!)

But, let’s investigate other possible options first!

Try the device attached to MIDI-B
…select one of the MIDI-B ports and try any of these:

  • any button, fader or knob
  • a mod-wheel/strip (ideally one that stays where you leave it!)
  • a foot-switch or expression pedal

watch the MIDI Monitor as you press/ move the control…
… if its gives a CC or a Note_on…
…and a Value (or Velocity) of more than 63 one way…
… and less than 64 the other…
then it will work!

Failing that…
…select one of the MIDI-A ports
…Try the device attached to MIDI-A
…and repeat!

Failing that…
…plug a different device into MIDI-C
…drag a MIDI-C-IN onto a new pipeline and select that
…and repeat!
(if this works you don’t need to keep this in-pipe in your patch – as long as it’s plugged in, Midihub will recognise it for mappings)

:game_die: Midihub can breathe new life into old MIDI gear…
…many of them output CCs that can be be used for mappings!

And if you’re still stuck follow the keyboard instructions above!


Now you’ve decided…
… what you’re going to use to turn the Arpeggiator ON & OFF…

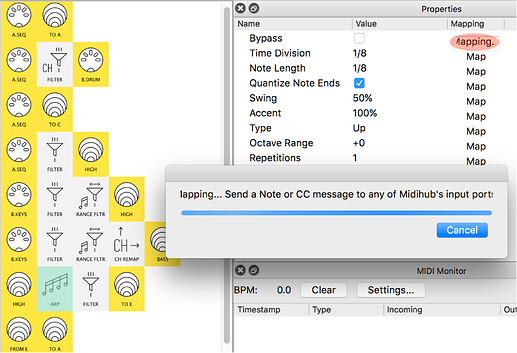
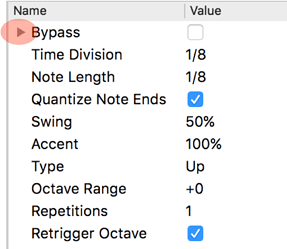
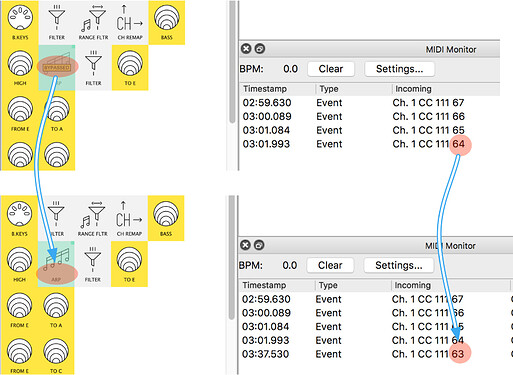
…click the Map button for Bypass:
Midihub is now waiting…

…press/move the ‘control’ you’ve chosen for mapping the ARP Bypass


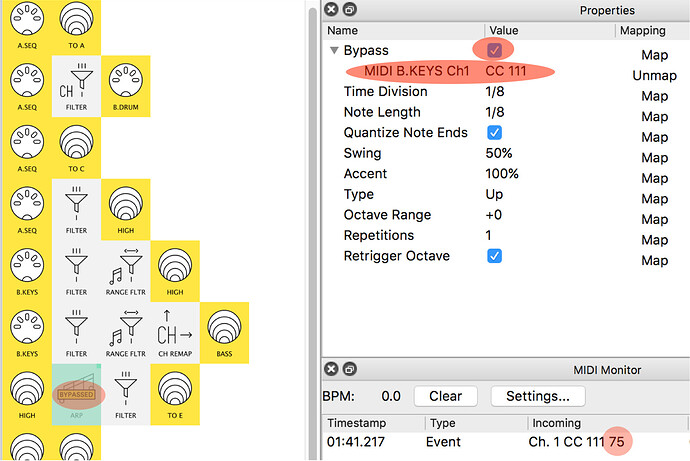
See how…

…the ‘waiting’ alert goes away…

…and that ‘control’ is now shown under Bypass

(…ours is CC#111 coming into the B.KEYS port on Channel1)

See also how the ARP Bypass is now ON…

…and the ARP pipe icon says “BYPASSED”

:eye_in_speech_bubble: There’s one other…

...small change to the pipe icon:

a little green square in the top corner…
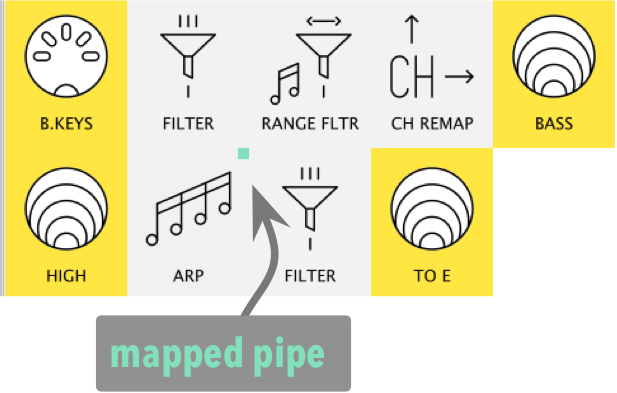
7b4_ArpMapCornerAmongHI

…if you see that, you know the pipe has a mapped property…

…or maybe many!


Now in the MIDI monitor, look at the first value the mapping received…
…for us above, it was…
Ch.1 CC 111 75

…you might see a different first value…

...or no value at all!


If you moved a control connected to MIDI-B
(our current input)
…check your MIDI monitor filters!
(if you’re using a key-press, then select a MIDI-B-IN/B.KEYS and watch there)


But if your control is connected to MIDI-A or MIDI-C

…you won’t see anything in MIDI monitor

…because those events don’t get through to the ARP in HIGHE.ARP!

:pushpin: a Mapping event only has to get through to one of the 8 ports in Midihub…

…not to the pipe itself!

The port for a Mapping event doesn’t even need to be in the patch itself…
(although you might include it temporarily, just to check what event is coming in…)

…if it’s a note or a CC

…on any channel

…coming in to any MIDI or USB port

…then Midihub can map it!

:arrow_lower_right: a little more on USB ports


Now let’s test turning the ARP

OFF (Bypass checked) and…
ON (Bypass unchecked)


We’re watching MIDI Monitor with the ARP pipe selected…

…because our mapping events are coming through that pipeline…

…you might need to select MIDI-A
(…or MIDI-C or wherever your control is coming in…)

…to see your mapping events…

…and watch for the yellow BYPASSED icon to appear or disappear!

See: our ARP pipe has gone from BYPASSED to normal:

See also: how our mapping value has just reached 63

:eye_in_speech_bubble: yours may be different…

...for example:

if you’re using:

  • a switch or a button…
    …it might ‘toggle’ between 0 and 127
  • a ‘momentary’ button…
    …it might be on 127 then jump back to 0…
    …as soon as you stop pressing it!
  • a keyboard key…
    …it will depend on on how hard/fast you hit it…
    …(too “soft” is like not hitting it at all!)
    …and you need to hold the key down to keep the ARP ‘BYPASSED’!

All you need is a value/velocity of:

  • 63 or less for Bypass to be ON (ARP is OFF)
  • 64 or more for Bypass to be OFF (ARP is ON)

:pushpin: Midihub has lots of properties which are ‘mappable’ switches
…they all work like this"

  • 0 - 63 → switch is OFF
  • 64-127 → switch is ON

:pushpin: with many MIDI controllers
…it’s also possible to set a custom range…
(…not just the default 0-127)

…it’s good to check MIDI Monitor at the input pipe…
…and get to know your control devices!


Once you’ve got the mapped Bypass working on your ARP

Save your mapped patch version with a name like 2In3Out_6map.mhp and…

:game_die: …try mapping some of the switches in ARP and other pipes…
…with the same control.

See how they all turn on & off together:

One control can map to many pipes’ properties…
.…this can be very useful when two pipelines have very similar pipes…

:eye_in_speech_bubble: can you see how the ‘pairs’ of Note Range Filter pipes…
…could be edited and mapped…
…so that one button would reverse their roles?

...just like this:


There are times when this “role reversal” of pipes and pipelines can be very useful…
(remember, like in this patch, you might do prior filtering to get just the effect you want…)

…and, as you can do it with Note Range Filter
… so you can do it with the other Range Filters too!

:arrow_lower_right: a little more on detail on mappings

After you’ve finishing testing using one control for many things…
…you can either:

  • click Unmap on all the extra properties you mapped, or…
  • just Open the saved 2In3Out_6map.mhp version again to reload it.


Now if you’re lucky enough to have a few spare controls…

and a sound device connected to MIDI A-OUT/ A.SYN
…or MIDI C-OUT/ A.SOUND

…it’s time to see mappings in action with the ARP pipe!

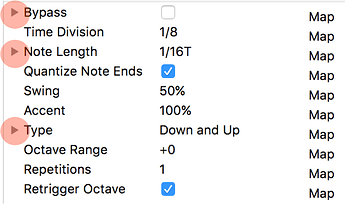
:high_brightness: map as many properties of the Arpeggiator
…as you can or…
…that just look interesting to try out first

...we've started with four...

Bypass, Type, Octave Range and Repetitions:
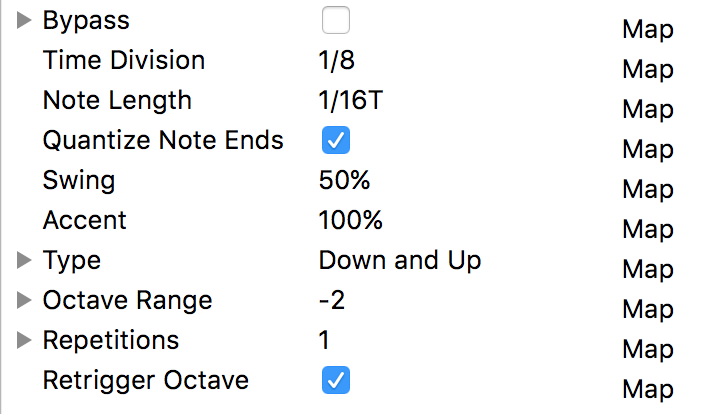
7f_Mapping_4choice

  • Bypass to switch between Arp and “free play”
  • and the others to hear what they “feel” like “live” play…
    …changing one or another between bars

Type is particularly interesting…
…partly just to see how easy it to “jump”…
…from say Up and Down
…to Down and Up Incl.
(depends a lot on your controls and how well you know the positions – time for masking tape?)
…and of course how it sounds!

Some properties are pretty clear (but still worth trying)…
…others like Quantize Note Ends an Retrigger Octave are a bit more mysterious
…for many of us!


:game_die: When you’ve got familiar with one set of mappings, Unmap them and start afresh with a new combination
(remember to use Save As when you find a mapping combination that triggers your imagination! Maybe add a Description note too for when you come back to it… )

:game_die: Take time to experiment with the combinations now available to you:

  • turning pipelines to some sounds ON & OFF…
    (…remember you can now map available controls to do this too!)*
  • playing bass notes with or without “free play” or “arp play”
  • changing how the arp behaves with your controls
    Now you’ve entered a whole new level with Midihub

:arrow_upper_left: a little more detail…

...on mappings:

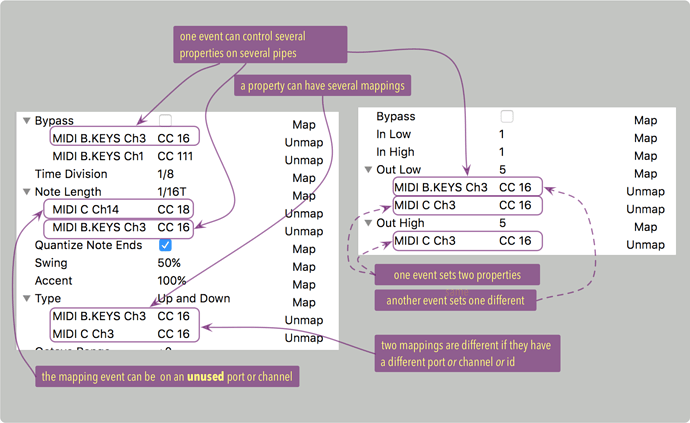
Here’s a quick round-up of mappings in Midihub:

  • almost every property in every pipe can be mapped;
    (exception: Ranges in the three Range Filters can’t because they have more than 0-127 settings)
  • mappings are “auto-mapped” - Midihub assigns the first CC/note it ‘hears’…
    …so make sure your ports are “quiet” when mapping!
  • mappings take the values of the note/CC as it enters Midihub…
    not on how your pipes might have changed it once inside Midihub
  • some properties have just two settings…
    …so the 0-127 values break into two groups [0;63] = OFF, [64;127] = ON
    (…so, as well as buttons, knobs with a centre-notch are useful)
  • many use all 128 settings;
  • but some have a set of options, like Type in Arpeggiator;
    (…so a button with a custom range can be set to jump between two settings you want)

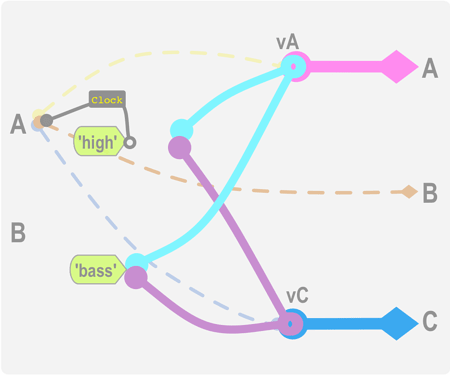
This diagram shows a few subtleties about mappings


:arrow_upper_left: a little more…

...on USB ports:

In this introduction to mappings, we’ve left out any discussion of USB ports.

That’s because:

  • some users prefer to set up their Midihub using a computer…
    …but then use it ‘stand-alone’ with just a power-source and MIDI cables
  • there are a few ways to link other devices to Midihub via USB

If you do intend to use your Midihub connected to a computer you then have 8 ports available!
We plan to cover USB → Midihub connections in future links :link:

2 Likes

Wrapping up

In this activity, you have seen how:

  • a multi-in → multi-out configuration can be set-up in various ways…
    …and how filters and remaps can be used to route event streams…
    …to best fit a plan for channels, ranges, and event-types
  • to name ports and add description notes to make patches clearer
  • more complex arrangements are made by re-using and repeating simple ideas…
    …and how a pipe can be duplicated with all its settings with alt-drag
  • Midihub is more than a router its a MIDI effects unit too
  • Midihub mappings can add more flexibility and control to your workflow

We hope you’ve also see that Midihub allows you to go much further than your original starting point, helping you go make the most of your gear and go beyond…


You have now completed this “New to Midihub” series

You might already be buzzing with ideas for your next Midihub project…


You might also want to build on what you’ve already done here…
…and try a few more…

:game_die: …Ideas for further development…

...with these patches:

Here are just a few ‘extras’ that might be fun to try:

  1. make the An Arpeggiator with a Keyboard split ‘switchable’ with a mapping…
    …giving you an Arp and “free-play”!
  2. Add a Randomizer pipe after the Arpeggiator to give a little variation to the arp notes…
    …you can Bypass it with the same mapping as the arp…
    …and independently too with a second mapping
  3. Add a Chance pipe instead…
    …or as well!
  4. Try a switchable Note Length pipe before the Arpeggiator
    …this would make the arp to play for, say, 4 bars per chord shape…
    …freeing your hands for other playing or control
  5. Give the Bass its own switchable Arpeggiator

These ideas stick roughly to the original plan and extend it. There are other pipes like Delay or Harmonizer (partnered with Scale Remap) which could take you into whole new playgrounds!


:clock1: development & play: potentially endless!


Notes

For this multi-device patch development, we tried to choose a set-up that would mirror at some of the things that many users might try in their first weeks and months with Midihub.

It may be that your needs are entirely different. We’d be interested to hear your ideas (and current areas of puzzlement as a new user!) here.

Please let us know if you have any suggestions for additions or improvements to this activity.


That’s the end of this episode, and the series!


We’d welcome your comments on how to improve this tutorial…

…or ideas for further tutorials in this style…
…remember, we’re all only Getting Started!

3 Likes