Virtual Mapping Techniques

Hey everyone.

This is my attempt to collect together techniques I picked up with physical loopbacks, and have adapted to the new world of virtual mappings.

I hope folk find something useful in the entries below

cheers, R


Intro
This topic describes various “techniques” that can be useful with virtual mappings.
The list is not exhaustive.
Please add your own or PM me with suggestions.

Each Demo can be taken as stand-alone; have a quick scan of the notes about patches which explains the common structure

Contents

That's as far as I've got right now...

…other sections to follow as hinted at below.

If anyone else wants to provide content –either that I’ve not yet written or stuff I’ve not thought of– that would be great.

(Add it in a reply or PM me and I’ll insert it in the flow)

I’d really like this to be the go-to resource to help more users realise how useful virtual mappings can be: more shared knowledge leads to a better Midihub world

2 Likes

Setting Mappings

The mapping buttons now have symbols to keep them compact:

MIDI Learn only works when Midihub is connected.
The other three buttons can be used any time (making it possible to write entire patches while disconnected)


When you have a lot of mappings to create, setting each of the four mapping properties by hand can be time-consuming.

Fortunately, the Dialogs are set up so you can effectively Copy & Paste mappings.

Here’s a sequence of examples:

You can set a virtual mapping that’s similar to an ‘external’ mapping

When connected, you can use the M button and turn a knob to MIDI Learn the properties…


(here we’re about to click MIDI Learn on Work with … Range Low ) :asterisk:


…then use Edit to adjust them


An existing mapping can be ‘copied’ to another property

Click Edit to see the existing mapping…

…and just click OK to ‘copy’ it…

…Now when you click Add on another property…

…those same values are now ready to assign to that ‘new location’…


(In this example both ‘Range High’ and ‘Range Low’ are mapped to the same message)


…or modify before assigning:


(In this example, the ‘Range Low’ property of the next pipe is now mapped to CC98)


With a little planning ahead it becomes easy to assign a whole bunch of mappings quite quickly.

(This is particularly true with virtual mappings: because we often can choose which CC#s, etc to use, we can make similar assignments only 1 or 2 small changes apart)


:asterisk: On some OS’s (Win? Linux?) the selected button has a helpful red border all the while the dialogs are open. On Mac OS X you just have to remember. I dunno if @Giedrius can fix this; in the meantime Mac users get extra practice with the UnMap button…

2 Likes

The Demo Patches

Although explanations and pictures might be useful, seeing pipes and pipelines in action is the best way to learn Midihub.

To help show each of the “techniques” below, I’ve written a brief patch/preset to illustrate the idea.


Each patch is written to be standalone:

  • You can use your own keyboard/controller if you want…

    (there are MIDI & USB “Input Lines” for that)

    …but there’s no immediate need.

  • That’s because every patch has a Midihub LFO generating messages for us:
    (the “Generator Line(s)” )

  • These messages then make the mappings:
    (the “Mapping Line(s)” )

  • Then the mappings make changes to certain key pipes:
    (the “Demo Line(s)” )

    • sometimes the effects will be visible without even inspecting the mapped pipe – for example a Bypass getting toggled or an Input/Output changing its Source/Destination

    • in other examples, a key property like Transpose can be inspected, or an LFO or Equalizer graph can be watched.

So each demo patch will follow this pattern:

Note that I will often make no attempt to give the mapped pipes an output.
That’s because the demos are only there to show a technique and leave it you to adapt it for real use.


Trying out a technique

Unless the new capabilities a technique opens up are really obvious, I’d urge users to play around with the demo patch:

  • use MIDI Monitor on pipes in the mapping line to see how the mapping is created

  • change, say, a Rescale so the mapped options change (eg. reverse its High/Low)
    (eventually, why not even map the Rescale options themselves?)

  • try hooking a mapping up to an external device’s parameter so you can hear the effect

  • Sometimes, there might be an extra demo patch to spark the imagination with extra ideas.
    Again, very grateful for additions from other users. I’ll add them to the relevant entry.


back to contents
2 Likes

“Scaled” mappings

Before Virtual Mappings, many users pined for the ability to limit or scale the range of incoming messages for a mapping:

so if a control sends in values in a [0,127] range, we might want the effect on a mapped property to be only in the range [0, 32]
Virtual Mappings allow us to use Rescale to modify the incoming messages before they
reach a virtual port and can be used as a mapping.

This Demo

VM1_rescaled_mappings.mhp

There are 3 Rescale pipes creating 3 mappings:

  1. CC#3 is Rescaled from 72 → 119;
    this changes the Input Pipe Source from Virtual A → Virtual G

  2. CC#4 is Rescaled from 52 → 76;
    this is used to restrict Transpose to ±12 semitones

  3. Note 24 (low C) Bypasses MIDI D OUT when the velocity is low

Extra

VM1a_rescaled_extra.mhp

This patch shows the effect of more than one synced CCs on, say, LFO or Equalizer


back to contents
2 Likes

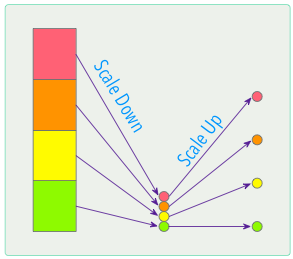
“Scale Down → Scale Up” mappings

Using Rescale to ‘squeeze’ the 0 → 127 range to a small number of values, then another Rescale to ‘stretch’ them is a good way to make a few ‘spaced out’ values

This Demo

VM2_double_scaled_mappings.mhp

  1. A Transpose pipe mapped to jump in octaves

  2. A Delay pipe with Time Division mapped to only give the dotted times (1/16• → 1/2•)


Notes:

  • as two mapping lines are used here for clarity, each has a CC Range Filter to prevent unscaled mappings reaching the same virtual out of the other line.
    This can avoided with just one mapping line obviously, or by using different virtual outputs, if you’re not already running short!

  • Rescaling down to a small number (3 → 20 ish) leaves a noticeably smaller range for the highest and lowest values. I compensated for this by clipping the In Ranges of “Scale Down” Rescales.

:thought_balloon: getting a “double rescale” right can take a little tweaking. Should have we an explainer for Rescale/Remap?


back to contents
2 Likes

“Toggled State” mappings

Another popular request answered by virtual mappings: a toggle switch that alternates with successive key presses.

Here the mapping line is mapped to itself: the value stored is Argument 1 of a Transform pipe is flipped by the Rescale at the end of the pipeline. This “reversed” value is then mapped back the Argument itself, changing it ready for the next key-press.

This Demo

VM3_toggle_switches.mhp

Many “switch” Transforms can be placed in the same mapping line.
This Demo uses 3 switches (but you can add as many as you like)- each controls a Bypass in the demo line.


back to contents
2 Likes

“Cycled State” mappings

A toggle state cycles between just two values. This demo show one way of cycling between up to 16 values by using Dispatcher

This Demo

VM4_cycled_mappings.mhp

The Demo line source will cycle between certain inputs dictated by the Dispatcher channels selected.


Notes:

  1. Whereas a “Scale Down → Scale Up” mapping will allow output values like 16, 24, 40, 48, 56, 64, this technique goes through the values in (‘Round Robin’) order
    and allows us to skip values to give, say, 16, 24, 56, 64

  2. This Dispatcher is set to the original ‘Round Robin’ Algorithm to ascend the values and then cycle back to the lowest.

    Setting to ‘Ping Pong’ or ‘Random’ will give quite different results which may also be useful or interesting.

  3. The key Transform uses Set Value to Incoming Channel. This produces values 0, 8, 16, 24,…
    A Rescale is included to change this to whatever mapping is suitable.


Other techniques which can give similar results include:

  • Multiple “Range” mappings.
    A pipe per value approach.
    More flexible, can be any length/spacing, more laborious to write and adapt

  • Scale Remap approaches.
    Limited to 12 values initially.
    Very useful when you need a custom route through a set of values
    (This is not yet included in the series, but an example can be found here)


back to contents
1 Like

“Trigger” mappings

Mappings that only happen when a value threshold is reached


to be continued…

Multiple “Range” mappings

Similar to above – using Transform pipes to select ranges of input values


to be continued…

“Timed Choice” mappings

Using Virtual mappings to distinguish between say a “long press” and a “short press”


to be continued…

“Anonymous” mappings

Even ‘traditional’ mappings can be made more versatile


to be continued…
In the meantime the role of “Anonymous” mapping are discussed here